In today’s world, technology is becoming an inevitable part of our daily lives, and the demand for interactive and smart devices is growing exponentially. However, have you ever wondered how these smart devices are created or wished you could build your own? Enter Arduino, a powerful open-source electronics platform that simplifies the process of creating interactive electronic objects.
What is Arduino?
Arduino is an open-source platform featuring both hardware and software components. It is designed for artists, designers, hobbyists, and anyone interested in creating interactive projects. The platform consists of a programmable circuit board (often referred to as a microcontroller) and software, or an integrated development environment (IDE), used to write and upload computer code to the physical board.
Why Start with Arduino?
Arduino is an ideal starting point for beginners because of its simplicity and flexibility. The hardware is relatively inexpensive, and the software is free and easy to learn. With a vast community and plenty of resources available online, beginners can quickly find support and inspiration for their projects. Additionally, the ability to interface with a variety of sensors and actuators means the possibilities for projects are virtually limitless.
Getting Started: What You’ll Need
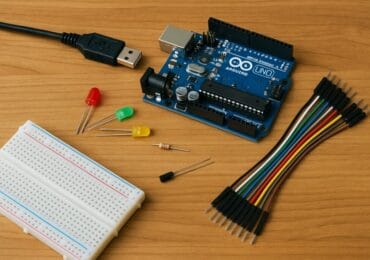
To embark on your Arduino journey, you will need a few basic components. The most important component is the Arduino board itself. One of the most popular options for beginners is the arduino uno kit, which includes an Arduino Uno board and a variety of other essential components such as resistors, LEDs, and jumper wires.
Your First Project: Blinking an LED
One of the simplest projects to start with is making an LED blink. This project introduces you to the basics of Arduino programming and circuit design. Here’s a simple guide to get you started:
- Connect the Arduino board to your computer using a USB cable.
- Open the Arduino IDE on your computer.
- In the Arduino IDE, go to File > Examples > 01.Basics > Blink. This opens a pre-written example sketch.
- Upload the sketch to the board by clicking the “Upload” button (right-pointing arrow).
- Connect an LED to pin 13 on the Arduino board using a resistor to prevent damage to the LED.
- Watch as the LED blinks on and off, indicating your successful first project!
Exploring Further: Expanding Your Skills
Once you’ve mastered the basics, you can explore more advanced projects and components. Consider experimenting with sensors such as temperature or motion sensors, building a robot, or creating a home automation system. The key is to start simple and gradually increase the complexity of your projects as you build confidence and skills.
Conclusion
Arduino offers an exciting and accessible way to explore the world of electronics and programming. Whether you’re a student, hobbyist, or aspiring engineer, the skills you gain from working with Arduino can open the door to countless opportunities. So, grab an arduino uno kit, unleash your creativity, and start your journey into the fascinating world of DIY electronics today!